Extreme budget GN build thread

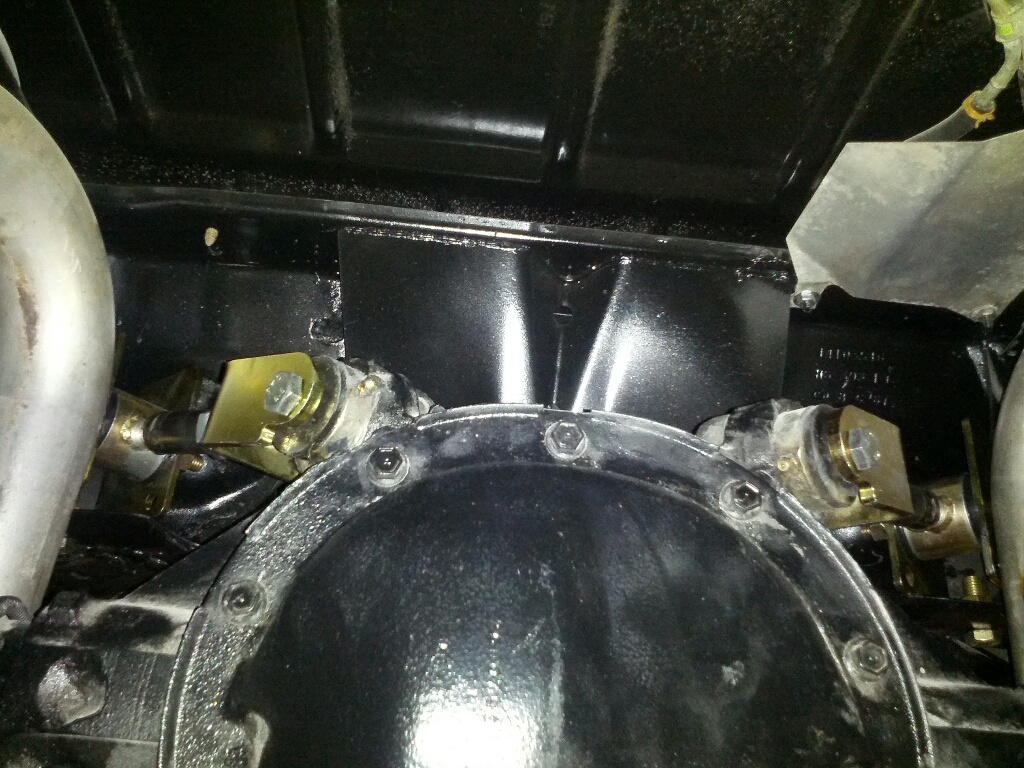
Mine are in the top holes in the buckets and I verified the hole position and geometry before I started making your arms. On my car the front of the LCA’s are maybe 1” higher than the rear bolts and the IC is around 43”-46” which is where I wanted the length on mine.
I set the control arm length the same as the instructions which I believe is 9.375” center-center but I didn’t check pinion angle to see where it ended up b/c I am too lazy. I’ve had it over 100mph with no vibration so I’ll leave it as-is.
ks
 
Thanks Kevin. Should I try just going wit hthe top holes? The middle works best for me because my rear LCA's are level, but if I need to put them in the top holes to get them to line up right and not bind I will do that. Just let me know. Even the top hole will be a big improvement from what I have now and it's not like this is primarily a drag car anyway.
 
Based on my car's measurements I'd say use the top hole b/c I know my measurements are accurate but if you want you can send me the measurements and I'll plot it out for ya. You'll definitely feel a difference with it no matter which hole you use.

What rearend do you have under it?

ks
 
Stock GM 8.5" 10 bolt. I have SPC lowering springs, so that is why my LCA's are level now. I think that is why my measurements came out with the middle hole as the closest to 100% AS and a good IC. I did it so long ago that I don't even remember where I put the measurements. I do know that I took the weight from a very similar GN instead of using my own, so it was not super accurate. I'll just put 'em in the top holes for now and see how it launches / drives. Thanks!!
 
Well, thanks for the advice Kevin. I set them to 9 3/8", put 'em in the top holes, rotated the diff a little, and viola! They're in! I dropped the car and it looks good so far. I have my driveshaft out because I am putting in new u joints. I'll check pinion angle and snug it up tomorrow. What do I need to torque the bolts to BTW? Also, any idea why my car sits 3/8" higher on the right rear? It was like this with the stock arms too. I haven't thrown in the spare and jack yet to see if it evens it out, but I'm guessing it will.

IMG_20130225_215129
 
Mike, Love the thread, you did a kickass job with everything you have done. I am blown away that you started a little "budget" build compared to what you finished with.

Here was my reaction when I realized you removed the frame to clean it up and change the body mount bushings... "WTF? I thought this was a budget build, did I click on the wrong thread?" LOL

Awesome work! Huge thumbs up!
 
Well, thanks for the advice Kevin. I set them to 9 3/8", put 'em in the top holes, rotated the diff a little, and viola! They're in! I dropped the car and it looks good so far. I have my driveshaft out because I am putting in new u joints. I'll check pinion angle and snug it up tomorrow. What do I need to torque the bolts to BTW? Also, any idea why my car sits 3/8" higher on the right rear? It was like this with the stock arms too. I haven't thrown in the spare and jack yet to see if it evens it out, but I'm guessing it will.

IMG_20130225_215129

To make sure it is the frame that is lower on the one side and not the body measure from the ground to a point on the frame on both sides. If the measurements are different then it's the suspension causing it, if they are the same then the body isn't sitting on the frame properly. I'm sure it's not the body with the work you've done to it but check it out anyway.

Assuming the frame is square and not tweaked the most common issues are sagging springs, preload in the suspension and springs not clocked properly in the spring pockets. I've heard that someone found the wrong lower A-arm on their car which caused it, also.

Here are the things to check and I would remove all the shocks to allow the suspension to move smooth and free:
Loosen ALL control arm bolts on the front and rear, then bounce up/down on it and see if levels out.
Front and/or rear springs are clocked wrong in the spring pads.
Front or rear spring sagging: Measure the height if each spring to make sure they are even.
Swap all the springs side to side and see if it switches which side is low.


ks
 
Mike, Love the thread, you did a kickass job with everything you have done. I am blown away that you started a little "budget" build compared to what you finished with.

Here was my reaction when I realized you removed the frame to clean it up and change the body mount bushings... "WTF? I thought this was a budget build, did I click on the wrong thread?" LOL

Awesome work! Huge thumbs up!

Thanks!

Recently the budget went out the window, but even in the beginning it was budget. Yanking the frame out cost me a few bucks for a couple 4X4's to hold up the body. Paint and sand cost me under $20. The bushing kit was like $150. So I cleaned and repainted the frame, whole underside of the body, and replaced all the bushings for under $200. I'd say that's damn cheap. I believe by the time I put in the new suspension bits, brakes, rebuilt the rear end, and did the frame / body I still only had around $1000 into the project. The motor build was fairly cheap since I did all the assembly myself. I also got the pistons cheap on Ebay, as well as the MAF, Gen II translator, injectors, etc. Even the paint job is considerably cheap considering I disassembled / reassembled the car myself. If I paid someone to do all this work I would be over $50K into this project by now. I'm pretty sure I have less than half on that into it at this point. So...still a budget build if you think of it that way. ;)
 
To make sure it is the frame that is lower on the one side and not the body measure from the ground to a point on the frame on both sides. If the measurements are different then it's the suspension causing it, if they are the same then the body isn't sitting on the frame properly. I'm sure it's not the body with the work you've done to it but check it out anyway.

Assuming the frame is square and not tweaked the most common issues are sagging springs, preload in the suspension and springs not clocked properly in the spring pockets. I've heard that someone found the wrong lower A-arm on their car which caused it, also.

Here are the things to check and I would remove all the shocks to allow the suspension to move smooth and free:
Loosen ALL control arm bolts on the front and rear, then bounce up/down on it and see if levels out.
Front and/or rear springs are clocked wrong in the spring pads.
Front or rear spring sagging: Measure the height if each spring to make sure they are even.
Swap all the springs side to side and see if it switches which side is low.


ks

Thanks for the advice Kevin. The front ride height is almost identical, so I can probably rule out the front suspension. I think I measured from the frame and saw the same thing. I will double check. It could be the springs are clocked wrong. I'll pull the springs, measure them, and swap them and report back.
 
Update:
The arms are in and I checked the pinion angle with them at the length Kevin suggested. Angle is at 2%. Good enough for me! The angle was actually a hair negative with the stock arms. As far as the ride height goes, I unhooked the shocks, swapped rear springs, and loosened all the control arms bolts with no change. The car has always sat like this, but in the past I assumed it was due to more air in my RR airbag. I don't use those anymore and that's when I noticed that the higher RR height stuck. I put the car on jackstands (4 on the frame) and the distance is still 3/8" higher on the right rear. That tells me that the frame is tweaked. This car has never been in an accident, so I'm just gonna chalk this one up to good 'ol 80's GM quality. ;)
 
Just read all 8 pages. You did a hell of a job, Your car is awesome. Thanks for sharing your build...
 
Update:
The arms are in and I checked the pinion angle with them at the length Kevin suggested. Angle is at 2%. Good enough for me! The angle was actually a hair negative with the stock arms. ;)

Excellent! Let me know what you think of the ride when you get some time to put some miles on it..

Too bad about the frame possibly being tweaked, tho..:mad:

ks
 
I finally washed, polished, and sealed the paint. Here is a sneak peak:

IMG_20130302_131438


I used Griots #3 machine polish with the orange light cutting pad on their orbital buffer and finished with their paint sealer on the red pad. A buddy of mine who details cars recommended their kit to me. All I can say is that I will only use their products on this car from here on out. I am an amature when it comes to paint care and this system made it super easy.

Here is my hood after just one pass:

IMG_20130302_124404
 
Alrighty folks, this car is pretty much done as far as being a project goes. I still will be finishing the car audio part as far as building a sub box and carpeting the trunk goes, but other than little tweaks and things here and there, I'm done!

I modded the ECM and got powerlogger installed. It's all setup for my WB02 and 3 bar MAP.

I ended up going the simple route with the front speakers. I mounted my Focal Polykevlar 5.25 components with the mids in the stock Concert Sound II door locations and the tweets bracketed in the bottom corners of the dash facing inward and upward.

I used some thick plastic I got from a fabric / uphostry shop as a moisture barrier and covered that with jute padding before installing the door panels.

IMG_20130304_215934


IMG_20130304_223013


Here is it all back in. The carpet, floormats, upper door panels, and seat covers are all from Nos4GN. Not sure if I mentioned that before.

DSC_0011.JPG


DSC_0010.JPG


DSC_0009.JPG


DSC_0008.JPG


DSC_0007.JPG


DSC_0004.JPG


DSC_0003.JPG
 
Top