You are using an out of date browser. It may not display this or other websites correctly.
You should upgrade or use an alternative browser.
You should upgrade or use an alternative browser.
LS1/f-body rear brake swap
- Thread starter TKGN1
- Start date
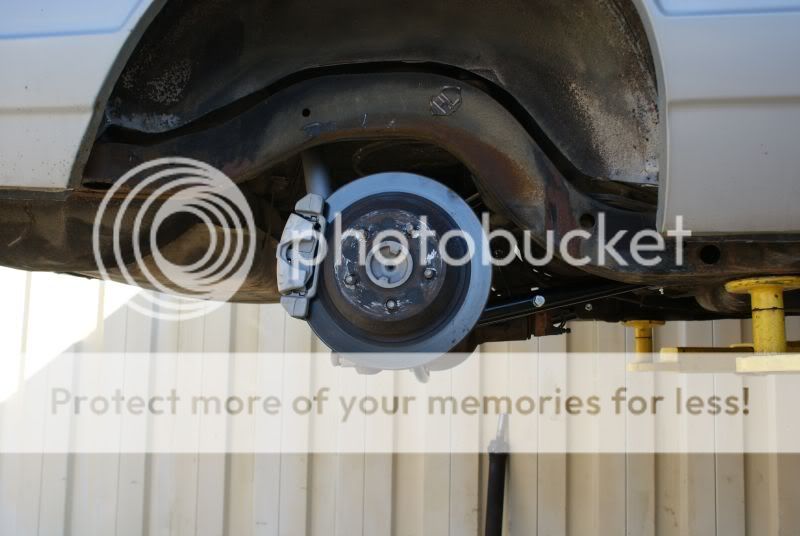
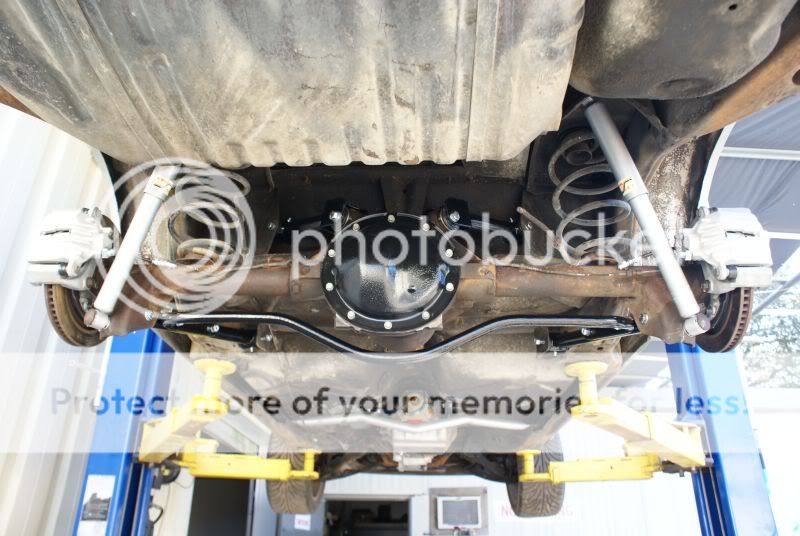
Got up under the car and took some pics for ya.
Need to do a little spring cleaning under the car as well.
I made the bushings to take up the difference between the mounting points and hiem(sp) joint, I have not noticed the car being any rougher or have any more noise due to the solids mounts.
Need to do a little spring cleaning under the car as well.
I made the bushings to take up the difference between the mounting points and hiem(sp) joint, I have not noticed the car being any rougher or have any more noise due to the solids mounts.
Attachments
"More Boost"
Major Member
- Joined
- Feb 13, 2005
ss
todd i know this is a old thread but will the brakes clear stock 86-87 ttype rims? thanksLS1/f-body rear brake install:
Before swapping the brakes, I relocated the shocks (see pic). I’m not sure if the LS1 brakes will clear the shock in the stock location, but if they did I would assume it would be a very close fit. On a stock height vehicle the calipers might clear the frame rails, but my car is lowered and extra clearance was needed to prevent the frame from hitting the calipers on a hard launch or harsh bump. I had previously notched my frame for wider wheels so there was no issue there. Other than those two issues, the swap is a straight forward and a fairly easy job. Also, I believe you will need to run 16” or larger wheels to clear the calipers; my 15” Weld wheels would not clear the calipers.
Parts needed:
The donor brakes can be removed from any F-body, 1998-2002, V6 or V8.
I picked up the parts from a local salvage yard, $40.00 for everything.
There is a sensor on the backing plate (for ABS) that will need to be removed, you can discard it, unless you can figure out how to use the ABS function on our cars.
Caliper assembly, including the short rubber stock brake line, and the “banjo” bolt that holds the brake line to the caliper.
Rotors.
Backing plate, be sure to keep the four bolts/nuts that are on the donor car.
Brake fluid
Gear oil
I also added longer studs while the axles where out (NAPA P# 641-1581) ½” longer than stock. These are not needed but it is easy to do while the axles are out.
Adjustable proportioning valve (I’ll elaborate on this later)
G-body mods:
Remove wheels, drums, and all brake parts associated with the drums leaving the brake line attached and the backing plate on for the time being.
Remove: rear-end cover, bolt for king pin, king pin, c-clips and pull axles out.
Cover the ends of the axle tubes with duct tape to keep trash/cuttings out of the tubes.
Disconnect brake line from wheel cylinder, plug line to keep fluid from getting everywhere.
Remove backing plate.
I used a sawzall to cut the top of the bracket on the rear end (see pic). I cut it directly below the large hole. Use a grinder to smooth the edges and also to round or chamfer the top two corners, you can use the LS1 backing plate to check for clearance here.
NOTE: I put the LH caliper on the right side of the car and RH caliper on the left side, this positioned the e-brake bracket so I could use my stock e-brake cables, and to mount the calipers on the rear of the axle rather than the front like the LS1s.
Clamp the backing plate on squaring the two mounting plates to each other while keeping the backing plate centered on the axle.
After getting the plate clamped I drilled the four holes through the axle plate using the four holes in the LS1 backing plate as guides. I used a 3/8 drill for this.
Bolt the backing plate on using the four LS1 factory bolts.
Clean off any shavings and remove the tape covering the axle tubes, install axles.
Slide rotor on, mount caliper to backing plate, and put wheel on to check fitment.
If all looks good, install c-clips, king pin, kingpin bolt, cover, and fill with oil.
The stock steel brake line will screw into the LS1 rubber brake line. I did have to move the stock steel line to the front of the axle to make the connection nice.
Some have done the next step differently, but I chose the adjustable proportioning valve for ease of use.
Next I removed the stock proportioning valve (on inside of frame on driver’s side).
I installed a T-fitting for the front brakes, basically straight from the master cylinder to the front brakes.
Install adj. prop valve between line coming from mc to the rear brakes.
After all lines are tight, bleed brakes and check for leaks.
Next is just setting the prop valve to where the front brakes lock just BEFORE the rears.
As for the e-brakes, I made brackets to support the cables (see pics) and adapters (see pics) to go from the stock cables to the “hook” on the LS1 brakes.
The e-brakes work awesome.
Side notes:
I am running vacuum brakes, LS1 front brakes, and 17” wheels with Nitto’s all around.
I definitely have no issues with stopping now.
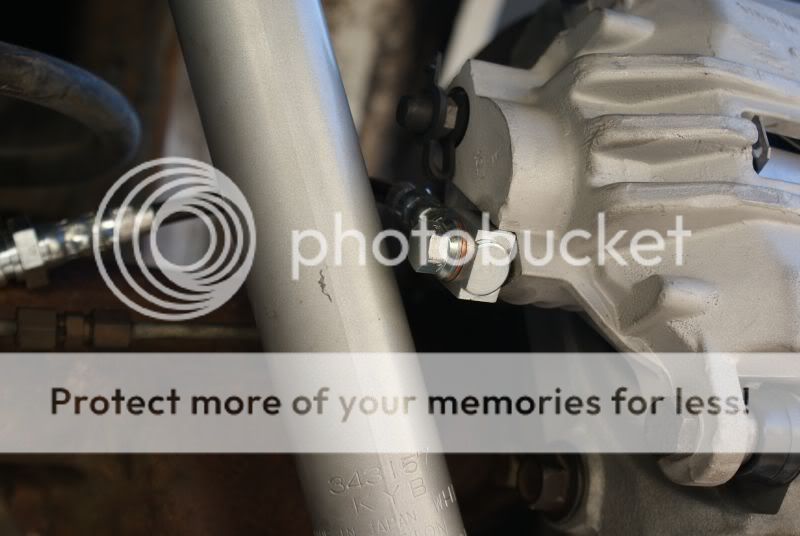
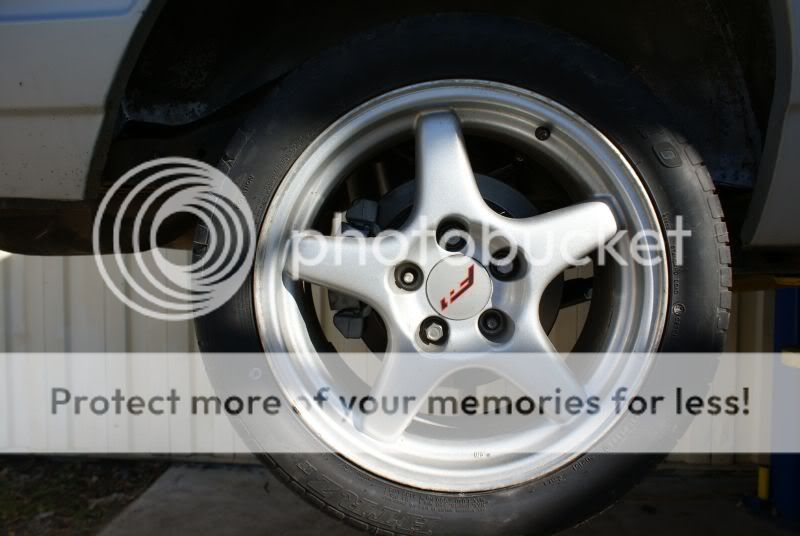
Ok. I havent seen any actual pictures of the clearance between the stock shock location and the ls1 calipers. So i thought id post some up and hope maybe it might help someone.


Dont mind the missing/****ty lug nuts, they are only temporary. This car has been a long term project and is currently not running.


Dont mind the missing/****ty lug nuts, they are only temporary. This car has been a long term project and is currently not running.
BTW the KYB's come with this screwed up double ended shock mount. Using that the shocks hit the banjo bolt for the brake lines. I canned those and used the old shocks mount bolt. The KYB piece you can see in the pic on the top of this page with the white monte carlo. It holds the shock out half and inch. The old mount bolt brings it closer to the rear end housing. Which allows for better clearance without relocating the shock.
This should help you some on the clearence issues with the shocks and calipers. This is the rustomod I started and haven't finished yet. Page 7 but if you want to go back then you may find it interesting.
http://www.turbobuick.com/forums/before-black-non-sfi-tech/322115-finally-got-some-time-7.html
http://www.turbobuick.com/forums/before-black-non-sfi-tech/322115-finally-got-some-time-7.html
Red Regal T
Senior Member
- Joined
- May 24, 2001
"More Boost"
Major Member
- Joined
- Feb 13, 2005
PBR that looks like a ford caliper?
not that that's a bad thing.........
not that that's a bad thing.........
I have since "pinned" the relocation bracket.
Your photo doesn't show how you bolted the shock.
Stock. I made no changes to the mount point or location. Ill get pictures of it, as soon as I can. I realized after the fact that I hadnt gotten that important picture. :frown:
BTW that bolt and nut setup is the same setup I canned. I think the setup I used will make the swap look much cleaner, while still providing adequate clearance. Not slamming you, just a thought.
PBR that looks like a ford caliper?
not that that's a bad thing.........
Factory GM.
Red Regal T
Senior Member
- Joined
- May 24, 2001
Yeah, thanks for that.  I'll have to see if I can pick up those different shock fasteners to eliminate the relocation brackets. I had the KYBs on the car, so didn't realize a shorter shock fastener would give me the clearance needed.
Similar threads
- Replies
- 4
- Views
- 467
- Replies
- 2
- Views
- 394
- Replies
- 5
- Views
- 949
- Replies
- 0
- Views
- 117


