Old School meets New - Supercharged LSA/4L85E into Grand National

Are you able to swap the LSA supercharger lid for the ZL1 lid? I have a friend with a LSa engine in his rod and wanted to swap it over. Do you know what parts are needed to convert it over? The ZL1 lid and the red cover looks great! EDIT UPDATE: Found conversion kit...

Yes, I did this already. Send me a PM and I'll point you to the cheapest GM dealer I found - much better than many out there. I think the ZL1 lid was $271, and the cover was something like $140.

Thanks, Shev!

Cheers,

Jim
 
Looking forward to hearing about the wiring. Please post those updates too if possible. Great project!
 
Fitting in the Speedtech chassis brace and Flaming River 670 steering box:

DSC03123.JPG


I'm covering stuff up with painter's tape until I know it is actually installed, mostly to protect the finish but it also reminds me that not everything is fully tightened up.

Ridetech MuscleBar also in test-fit along with the new steering centerlink and drag link:

DSC03124.JPG


They clear by about 3/8".

From the bottom:

DSC03128.JPG


And a shot of the anti-roll bar arm from the outside. It's very tucked into the frame - thought it was going to hit a weld that sticks out a little but it also cleared.

DSC03127.JPG


So far the only bummer has been the Speedtech chassis brace hardware and fit. The fit is not a bolt-on for my car, and that may be my car's fault. But the hardware they give you, without any instructions btw (although it's pretty easy to figure out), doesn't fit the car and doesn't fit the brace! They give you 7/16" HW but only 2 holes out of 6 are meant for it - the others are drilled AND POWDER-COATED for 3/8" bolts. So you either have to buy your own HW or drill out the new, glossy powder-coated finish of the your new brace. I need to call and see what they say and how their customer service is. I'll report back.

Jim
 
These just got here - the RideTech triples I saved up for:

RideTech_Triples_F&R.jpg


They are the last major piece I needed for this build. I'll try to get the fronts on this weekend.

Jim
 
Figuring out where to mount the remote oil reservoirs:

DSC03139_cropped.jpg


A nice feature is that the shock's hoses are covered in a flexible, clear sheath.

DSC03143_cropped.jpg


I need to make sure the hoses have room to move freely as the suspension travels up and down and doesn't touch anything hot or anything that will abrade through it.

In other areas, I have been getting the Moser 12-bolt ready to pull out of the Gray Ghost to put in here.

And I've been slowly working on the porting of the blower case.

Lots of honey-dos right now as she wants the garden planted and some stuff fixed around the house. Plus night school.

Jim
 
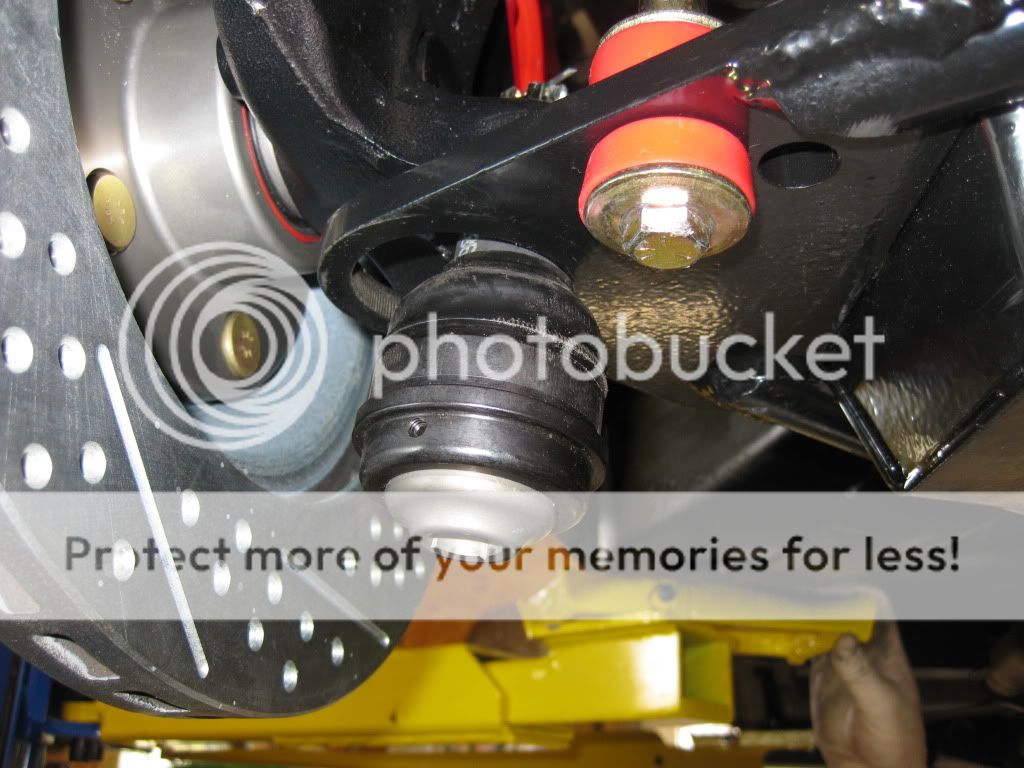
Well, I was getting close to buttoning up the front suspension when this same thing happened to me (this is a picture from SicMonte's same lower control arm/Howe ball joint set up):

Picture046-1.jpg


Yep, the ball joint popped out. Turns out that Marcus at SC&C had dealt with this same problem at least back in 2008, which ticks me off. The holes in the SPC arms were designed for the Moog "problem-solver" ball joint which is slightly oversized. The Howe ball joint is the stock size. Sure would have been nice if the problem were fixed by now, or at least tell me when I'm purchasing that extra buck option. Very poor customer skills even if he does know his stuff.

Anyways, had to grind through the powder-coat, grind off some of the Alodyne coating from the ball joint to set it up for welding. My buddy Tom busted out the stainless rod and put in 4 nice spot welds per side:

SPC LCA after welding 032614.jpg


I cleaned up the part and shot the welds with a couple coats of Chassis Black. Looks OK and the welds have good penetration. Once the weight of the car is on the suspension the lower ball joint is retained anyways. But it would have been at risk anytime I jacked the car, and you know when it would have failed!

I decided to paint the firewall so I got some Eastwood Extreme Underhood Black as it is quite resistant to brake fluid and I have dribbled fluid in that area before when bleeding or installing a new MC. So I remove everything (within reason) and clean it well with mineral spirits, then shoot it. Looks good but when it dried it had some fish-eye in it. So I waited a day then lightly sanded the fish-eye areas then shot it again, admittedly on a rainy day (high humidity) when it was like 55F in the garage - all around the edges where I sanded it wrinkled up, plus the fish-eye was still visible. Second round, same outcome, but now the paint looks cheesy around the entire sanded area.

So guess who's stripping their firewall?

DSC03150.JPG


Since this was supposed to be pretty much a quicky install, where I was going to circle back maybe next winter and do a full frame-off, I probably should have put up with a little fish-eye that would have been hidden by the blower.

This is the first pass of the stripping - got a lot of stuff off including a bunch of that hard tar they use as sealant, but I need to go over it at least once more.

I did carefully fold down the body seam from the left side of the bottom of the picture almost over to under where the steering shaft will go. It helps the 4L85E fit in there and presents a smooth surface to pass fuel lines, etc. over. I'll probably fold it down a little bit more towards the driver's side, too. It also helps with clearance for the headers.

Once I finish the firewall paint, get the front wheels & brakes on and plumbed I can set that motor up in there. In between coats of primer and topcoat I'll get back to finishing the porting on the blower.

Jim
 
I ended up having to grind my weld to get the ridetech musclebar to fit. It's a nice piece.
I''ve thought about a GNX clone running a similar setup, but I'm in the middle of my own project. This car should be a blast to drive. Keep posting!
 
Wrapping up the arduous process of stripping the firewall, including chipping of all the bits of that tar sealant they loved back then.

Almost ready for the final wipedown here (didn't worry about bits covered by the heatshield or wiper motor):

DSC03154.JPG


In first coat (of 2) of dark grey primer:

DSC03156.JPG


After 3 coats of satin black enamel:

DSC03159.JPG


I removed the masking tape after the final coat flashed and did a quick, careful shot of the edges on each hole, mostly for corrosion protection as they will be filled or covered by cables, master cylinder, etc. I'll post a final pic tomorrow. The paint also get less glossy after about 8 hours, more like the frame.

Thanks for the comments and PMs.

Jim
 
Getting it back together after the firewall and removal/repaint of the inner fender liners:

DSC03166.JPG


Made a gasket for the TNT manual brake bracket out of Felpro gasket sheet because I didn't want to leave it unsealed but I also didn't want to put a bead of RTV on there. This was a clean option:

DSC03175.JPG


Holding the Wilwood master cylinder and TNT bracket in place:

DSC03172.JPG


Tomorrow I will swap the proportioning valve and clean off the brake lines, then get this all installed.

If you get the entire system correct, I really like manual brakes better than most American power brakes. I have a similar setup on the Grey Ghost and they are very progressive, nice distance on the pedal stroke and capable of really pulling the car down from speed. The final steps after everything is bled and ready to drive is to bed in the new pads then perform some really hard stops to ensure you get the rear proportioning valve adjusted just right - the rears should never lock up before the fronts.

Things should speed up a bit after this. The engine compartment is a lot cleaner than it was before.

Jim
 
Last edited:
I'm not sure I've driven a car with manual brakes. I'd sure like to see how they perform sometime as that looks so much better than a vacuum booster.
 
Made some progress this weekend.

Got the new proportioning valve for 4-wheel disks in there, cleaned all the brake plumbing and blew it out with air pressure. Painted some brackets, only the modified tranny linkage one shown here (extended 2" to the rear with a welded in plate to accommodate the 4L85E tranny):

New_prop_valve&clean_plumbing.jpg


I painted the new brake bracket with a couple coats of VHT clear. The brake lines at the MC are not finalized yet - need to double-check the routing then tweak them for the best fit.

I took advantage of the nice day to pull the Moser Pro 12-bolt from the Grey Ghost. It's got an Eaton posi, 33-spline axles and 3.73 gears in it and will hold up under this new drivetrain quite nicely. I also modified it a while ago for the Wolfe Racing upper control arms with spherical bearing. Since it is up high under the car and I didn't drive in the rain, the spherical bearings have stayed remarkably clean. The rest of the rear will get a good cleaning, new seals, a gasket, gear oil and a paint touchup:

DSC03176.JPG


DSC03178.JPG

It is a heavy sucker to get out of there safely - especially by myself. Took my time and used 2 jacks and kept my fingers out of the way!

I'll just keep this out of the way for a bit while I continue on at the front of the car. Stuff at the back is going to take 2 weekends easy.

Jim
 
So the manual brake conversion is just that bracket and master cylinder? No pedal mods? Again, I haven't driven a manual brake car so I'm very curious. It does look great!
 
I also like the speedtech chassis brace. I bought an installed the detroit speed brace before I knew about the speedtech. Both appear to eliminate the possibility of running a stock location stretch intercooler.
 
So the manual brake conversion is just that bracket and master cylinder? No pedal mods?

Hi Bishir,

You may need a smaller bore MC when you go manual, for proper pedal travel and feel. The stock pedal has another hole already, up higher on the pedal arm, that increases the leverage to the point needed for the manual brakes. Sometimes a brake pad change is useful depending on what you are doing with the car. I have always upgraded my brakes at the same time as going manual so I can't say how manual would be with stock brakes, even with the pedal hole change.

As far as the Speedtech brace, I didn't worry about the IC as my install doesn't utilize that space - I have a monster water heat exchanger to put in front of the AC condenser. Can't comment on whether a stock location stretch IC would fit.

Jim
 
Lots going on, working on different sections, waiting on a couple parts, stripped a special locknut so I'm waiting for a replacement (old torque wrench way out of spec) before I can button up the driver's side front suspension & brakes.

Masked off the basic motor, removed sensors, plugged holes, etc. so I could give it a thorough degrease. Then I shot it with 2 coats of VHT clear which should keep it cleaner and help shed any dirt and oil when I wash it in the future. Did the oilpan and ends of the heads but left the valve covers alone as I am going to powdercoat them with a nice black wrinklecoat after it's up and running. Of course I masked off the pullies and other bits before shooting:

DSC03210.JPG


DSC03208.JPG


Looks like next Saturday I will put the motor in. I am going to try lowering the front end down as much as is practical then putting the motor & 4L85E in as a unit. With the engine tilter and some patience it turns it into a 1-man job, as long as I get the balance point just right and am able to put the entire unit up over the radiator support. I've done it before with bulkier oilpans so this should be pretty easy.

After that I can testfit which set of exhaust manifolds to use. The LSA kit cam with 2 sets of manifolds - the CTS-V and the F-body ones, plus I have a set of the cast iron Hooker manifolds that are supposed to fit the G-Body best of all, clearing the front control arm's rear mount points. Before I drop this in I will put on the ZL-1 starter and heatshield.

Still working on the brake pedal/master cylinder setup. The brake rod from manualbrakes.com is too short for this setup so I think I need to go back to the Wilwood rod-in-MC setup and fab up a threaded receiver for the pedal end.

Not enough hours in the day!

Jim
 
Got a decent amount done today and ended up with the motor and tranny mated for the first time. Yesterday after work I cleaned the transmission and shot it with clear as well, also the cast transmission cover that goes on the bottom after it's all it. No way am I laying down under that on the hoist to do anything! All I need to do to wrap up the unit for initial install is to bolt the flexplate to the torque converter, and bolt on the Dirty Dingo engine-side motor mounts.

Other than the 2-ton hoist, the engine tilter is the most useful tool around for pulling motors. It literally turns it into a 1-man job. Without the tilter you can't really put the motor and tranny combo in together, but as long as you don't have a monster kickout or super-deep oilpan you can do it with the tilter. The 2-ton hoist is nice because the arm length when it is set to 1-ton is quite long - much longer than the smaller 1-ton hoist.

I don't think this Mast pan is going to present a problem. I also testfit the Hooker cast headers and they fit with only the tiniest bit of filing to clear one head stud. One less thing to worry about.

Engine & 4L85E together.jpg


Engine & 4L85E together2.jpg


Engine & 4L85E wHoist.jpg


So with this rig I can stand on the right side with the motor/tranny level, lift it high over the radiator support, roll it so it's above the engine bay, then tilt the tranny down, lower it a little, push the hoist back a bit, rinse and repeat until it's all the way in there. The chain has enough give to allow me to align the motor mounts and ease it down. An unexpected bonus of the epoxy coating I put down on the garage floor is that I can slide the hoist sideways without much trouble if I need to.

So tomorrow's the day, unless Murphy decides to swing by and visit.

Jim
 
Last edited:
It took a little dancing between the height of the jack under the car, the hoist and the tilter, but I got it in without major drama. I wanted the car as low as possible but the long legs of the hoist had to clear the front suspension bits and Ridetech brace. I put some foam on the tip of the tranny to help prevent scratches on the firewall. The only tiny blemish is where the rear coil bolt (which I should have removed) touch the fiberglass AC housing and made a little mark. Easily dealt with.

Here the progression:

You can see the Dirty Dingo adjustable engine mounts attached to the motor here. I set them most of the way forward (sets the engine rearward), mostly for header clearance but it helps the weight distribution a bit. I ended up having the move them all the way forward to engage the frame side solid mounts.

DSC03224.JPG


More than partway in - I should have stopped and taken 1 more photo coming over the rad support.

DSC03234.JPG


Leveling out some:

DSC03234.JPG


In with the motor mount bolts in and the driver's side Hooker cast header mocked up:

DSC03249.JPG


And the same on the pass side:

DSC03248.JPG


You can get a good sense of the clearance of headers around the front lower control arm rear attachment points. Much better than dealing with the CTS-V or F-Body factory headers which would have forced a sharp bend in the exhaust leading into the cats.

Off to play with the tranny crossmember.

Jim
 
How it looked when I finished the night:

Looks like I'll need to relocate the #8 coil inwards maybe an inch - pretty easy mod. I thought clearance was going to be more of a problem with the AC.

DSC03251.JPG


Took off a bunch of the remaining masking from painting and install protection. I'm much happier with the engine compartment now.

DSC03255.JPG


I pushed the engine as far back on the motor mounts as I can go without running into clearance issues at the rear.

The radiator isn't in but I'm really happy with how far back I got everything to sit. And from earlier pictures it doesn't appear I'll have any problems with clearance on the driver's side (for PS and Alt). I'll testfit tomorrow to be certain. The oilpan fits like a champ - it is flush with the bottom of the engine crossmember. The Chevy pan that they sell protrudes down like 2+ inches which would have made dropping it in a real bear - would have hit the crossmember with that pan and probably couldn't install the motor/tranny as a unit. Also zero conflicts with the steering, Ridetech brace or rollbar.

DSC03256.JPG


Still need to get the tranny mount and crossmember installed - it is held up now by a jack with a stack of wood blocks. Maybe tomorrow night.

It was a productive day and pretty fun, and no blood was drawn. Hard to beat!

Jim
 
Last edited:
Nice, if you didn't have the stock a/c box it looks like the engine could go even further back with different mounts... Even so, it looks good.
 
Top