
You are using an out of date browser. It may not display this or other websites correctly.
You should upgrade or use an alternative browser.
You should upgrade or use an alternative browser.
Rear main replacement
- Thread starter TurboDave
- Start date
If you still have the original engine mounts and they are sacked out, it takes a little wrangling to get the oil pan off/on, due to less. When pulling the upper half rope seal out, hopefully you can get it in one pull. If it starts to come apart then it takes a little doing to pick it/push it out. Like anything else, a little patience goes a long way,
GNONYX
Well-Known Member
- Joined
- Oct 16, 2009
At first when mine started to leak and not knowing how to replace it, I was worry I might screw something.
Do a lot of reading, research, research research; take you time, and I place the bearing cap inside a zip-lock bag since I didn't want not even a dust on the bearing cap.
I used a regular floor car ramp drain oil, slowly slide the oil pan off and drag it against the "A" frame.
I still the original 90,000 mile motor mounts and you don't have to lift the engine.
Rear Main Seal Replacement Tips
By Chris Fasulo and Mike Smith
You Will Need
A good time to do the rear main seal is during an oil change as you have to drain the oil anyway. You'll also want to set aside several hours for this job as it is a good idea A) to make sure everything is clean and B) to give the RTV sealer used in the main cap side cavities time to cure. Despite the numerous steps below, the job is not hard to do if you just take your time. All attempts have been made include everything needed.
Stuff you'll need...............
REAR END SEAL REPLACEMENT
I removed the balancer bolt with a 3/4" De Walt cordless Impact Driver and a 1 1/8" socket from Advance Auto.
You might want to replace the Oil Pickup Tube being that they're cheap replacement.
You can use the impact driver to snug the balancer bolt back on, but I would use a torque wrench to tighten the bolt to 220 ft lbs.
Clamp vise grips onto the flexplate and it will wedge up against the block and stop the crankshaft from rotating, as you are tightening the bolt.
Also use red loc-tite on the cam bolts and on the Oil Pick Up Tube bolts, and I used it on the balancer bolt as well.
Same may said don't need to, but I did as my security satisfaction.
http://www.gnttype.org/techarea/engine/rearmain.html
This is some info to start your engine journey, and Definitely ask questions when in doubt
Do a lot of reading, research, research research; take you time, and I place the bearing cap inside a zip-lock bag since I didn't want not even a dust on the bearing cap.
I used a regular floor car ramp drain oil, slowly slide the oil pan off and drag it against the "A" frame.
I still the original 90,000 mile motor mounts and you don't have to lift the engine.
Rear Main Seal Replacement Tips
By Chris Fasulo and Mike Smith
You Will Need
A good time to do the rear main seal is during an oil change as you have to drain the oil anyway. You'll also want to set aside several hours for this job as it is a good idea A) to make sure everything is clean and B) to give the RTV sealer used in the main cap side cavities time to cure. Despite the numerous steps below, the job is not hard to do if you just take your time. All attempts have been made include everything needed.
Stuff you'll need...............
- New Neoprene rear main seal
- Black or Ultra-Black, O2 sensor safe RTV Sealer
- New Oil Pan Gasket
- Breaker Bar
- 1/2" drive ratchet, 5/8" socket for rear main cap bolts use a 6-point socket on rear main cap bolts!!!
- 1/4" drive ratchet, 1/2" & 7/16" socket for oil pan bolts
- Torque wrench (1/2" drive, 0 to 150 lb/ft min)
- Needle Nose pliers
- Rubber Mallet or "soft" hammer
- Rags & Acetone to clean surfaces
- Small screwdriver and/or putty knife to clean off old RTV sealer
- New oil screen pick up gasket
- Piece of stiff sold copper wire--plastic coated is O.K.
- Drain Oil, remove crossover pipe and oil pan. Depending on you car, you may or may not need to lift one side of the engine to get the pan off. Some guys have used their engine tie down to rock the engine over to one side. If you do need to jack up the engine use a block of wood (piece of 2x4) between the engine and the jack. Locate the jack at the front of the transmission pan. The three bolts at the front of the pan are smaller (10mm) than all the others. There is one bolt on the passenger side that secures a clamp that holds the tranny lines. This one can be a real pain to get off (try using an open end wrench.) There is a baffle in the oil pan and it can hang up on the oil pickup screen. If you have trouble removing the pan, try rotating the engine to get the counterweights out of the way. Removal of the converter dust shield may also provide more clearance. As a last resort, removing the pickup tube guarantees that the pan will come off.
- Inspect the oil pickup screen. You may find your old rear main seal on the bottom of the screen!!! *IF* the screen looks like it needs cleaning or is all clogged up, remove it and clean it. REPLACE the gasket that goes between the block and pick up. Apply loctite thread sealer to the oil pump pickup bolts. These bolts are prone to working lose. If they do, you will lose oil pressure and your engine soon after!!! Factory torque spec is 96 inch/lbs (or 8 ft/lbs.)
- The torque spec for the rear main cap bolts is 100 lb/ft. It is helpful to have a breaker bar to get these bolts loose. Once loose, the bearing cap is more than likely going to stay "stuck" in place. The side cavities of the cap are filled with RTV sealer. One trick is to loosen both main cap bolts completely and pull them about 1/2 way out of the cap. You can then use them as "handles" to wiggle the cap front to back to get it loose. You may also need to pry against the crank flange and the back side of the cap to get it loose. Keep working at it...that old RTV can be tough to break loose! You can also run a very small screwdriver up the cavities to break loose the RTV. DO NOT DROP THE CAP! The lower half of you rear MAIN BEARING will be in the cap. Don't get any dirt on the bearing. The crankshaft journal will also be exposed with the cap off. Take care not to nick or scratch it-- there should be no need to even touch it.
- Move the main cap to a work bench. The lower half of the main seal can be pulled out by hand or with a pair of needle nose pliers. ALL of the old RTV sealer needs to be removed from the side cavities and sides of the main cap. Lube one half of the new main seal and slide it into the groove in the main cap. The split part of the lip on the new seal faces the front of the engine. The package should show the correct orientation of the seal lip. Set the cap aside (covered to eliminate the possibility of airborne particles falling on it.)
- Again, depending on the car, the upper half of the main seal may be easy or difficult to remove. Remember, your working around your crank journal so be careful. Try and grab the main seal with a pair of needle nose pliers and pull it out. If it comes out in one piece you're all set. If it breaks, you may need to gently slide a piece of stiff insulated solid copper wire up in to push the remaining piece(s) of seal out. Sometimes it helps to have someone turn the engine while you push on the seal to remove it.
- Once the old seal is out, clean off any RTV sealer on the block. Lube up the other half of the new seal and slide it up into the block with your thumb--make sure it is facing the right way!
Note: One trick is to insert the new seal so that the mating faces of the new seal are not lined up with the mating faces of the main cap. About a 1/4" extra rotation one way is enough. - Put a thin coat of RTV sealer on the cap-to-block mating surface of the main cap and on the chamfered edge. Lube the main bearing with clean oil. Make sure the bearing is seated in the cap. If needed push the bearing into the cap and make sure the tang is engaged in the slot in the cap. Install the cap back in the block. You'll be able to push it up about 95% of the way by hand. Then tap on the bottom of the cap with a rubber mallet to get the cap seated back onto the block. Install the main cap bolts and torque them to 25, 50, 75, then 100 lb/ft--or you can just set your torque wrench to 100 lb/ft and turn the bolts a 1/2 turn or so at a time till you reach 100.
- The side cavities need to be filled full of RTV sealer. This can be as much fun as getting the pan off! RTV has a viscosity of about 200 weight! (Do not use the rubber inserts that come with the new seal; just use RTV sealer.) Make sure you start with a new tube of sealer. Cut the tube so it will fit into the side cavities (one notch down on a new cone tip.) One trick is to slide a flat washer over the tube tip and use it to have something to push against as you squeeze the cavities full. Stick the tip in and squeeze away! Keep filling the cavities until you see it squirt out the sides of the main cap. Stick a piece of wet wire into the cavities and remove. This is done to break any air pockets and provide the moisture needed to cure the RTV.
- Reinstall oil pan and crossover pipe. Apply a smear coat of RTV to the seams where the main cap meets the bottom of the block--where the oil pan bolts on. You can also put a smear coat where the front cover mates to the block. If your using a rubber (stock) oil pan gasket it is going to be tricky getting the pan up and in place without the gasket moving all over the place! If you can get a cork gasket you'll be better off! Don't be afraid to use a few dabs (just don't use globs!) of RTV to stick the gasket to the pan. Install all oil pan bolts loosely (to make sure they all go in straight) and then tighten to 96 inch/lbs (or 8 ft/lbs.)
- Fill her up with oil and a fresh filter. If you removed the oil pick up screen, disconnect the power to the computer and crank the engine over to make sure you are getting oil pressure. (If you are having trouble building oil pressure, remove the spark plugs and turn over the motor. It will spin much faster without the compression load dragging it down.) Start the engine and keep an eye out for leaks for the next few days.
REAR END SEAL REPLACEMENT
I removed the balancer bolt with a 3/4" De Walt cordless Impact Driver and a 1 1/8" socket from Advance Auto.
You might want to replace the Oil Pickup Tube being that they're cheap replacement.
You can use the impact driver to snug the balancer bolt back on, but I would use a torque wrench to tighten the bolt to 220 ft lbs.
Clamp vise grips onto the flexplate and it will wedge up against the block and stop the crankshaft from rotating, as you are tightening the bolt.
Also use red loc-tite on the cam bolts and on the Oil Pick Up Tube bolts, and I used it on the balancer bolt as well.
Same may said don't need to, but I did as my security satisfaction.
http://www.gnttype.org/techarea/engine/rearmain.html
This is some info to start your engine journey, and Definitely ask questions when in doubt
I commonly use a drywall screw to help remove the upper half of a rope seal. Screw it in and use a set of locking pliers on it and push the other side up as you pull the pliers. Should come right out
Sent from my iPhone using Tapatalk
Sent from my iPhone using Tapatalk
Thanks for all the info, sounds like good winter project. I'll probably pull the pan plug, let it drain for a week, pull the pan, which should be easy since I have both HRParts motor mounts, and let that system drip for a week before crawling under there to give things a try.
Sent from my iPhone using Tapatalk
Sent from my iPhone using Tapatalk
Last edited:
Gene Van Horn
Active Member
- Joined
- Feb 20, 2013
Those are some nice and very detailed instructions,make it sound like even i could do it. Great job.
Buckshot G/N
Well-Known Member
- Joined
- Nov 2, 2011
Really.. thanks a lot for the detail instructions .Now I have a winter project.
GNONYX
Well-Known Member
- Joined
- Oct 16, 2009
I also found this other one in my Word Doc, but for some reason I can't upload so I have to paste it.
Some info may be repeated again, but I don't want to edit my original thread, as some might not be able to see the revised on the original thread:
While you do plan on replacing the rear end seal, and if you haven't done it already, you might want to replace the front seal, timing chain, and cam button, since the original cam sprocket teeth is cover with nylon.
Most would said TA Performance timing chain replacement, but I don't know if you're going to a single or double roller chain.
http://www.taperformance.com/products.asp?cat=186
You can get most of the parts from NAPA for a reasonable price
New tensioner – NAPA http://www.napaonline.com/Catalog/CatalogItemDetail.aspx?R=NTP95158_0191974675
$4.84
Updated cam button NAPA http://www.napaonline.com/Catalog/CatalogItemDetail.aspx?R=NTP95189_019197467
$15.14
Front cover gasket set – NAPA http://www.napaonline.com/Catalog/Result.aspx?Ntt=tcs45930&Ntk=Keyword&Nty=1&N=599001+101987+50008+2
$9.99
You might not have to get another oil pan gasket if your is rubber made and not ripped, just make sure it's clean on both sides.
http://www.gnttype.org/techarea/engine/rearmain.html
This is some info to start your engine journey, and Definitely ask questions when in doubt
There will be many questions you will be asking as you go along with the procedure of removing and installing the new parts.
Many will chime as to their way of priming the oil pump for oil pressure; this is my way if you choice to do so:
First and most important disconnect the orange wire behind the battery, and you must have an oil pressure gauge in order to make sure you do built up oil pressure before you reconnect the orange wire for start up.
I didn't pack the oil pump with Vaseline as most do
I first filled the oil filter as much as I can and then put 3 quarts oil in oil pan , then I remove the lower oil cooler from the radiator taped it against some pipe so the oil cooler is vertical position. Then place a small funnel inside the oil cooler hose, you will need a Chevy oil pump prime tool and place it inside the Cam Sensor hole; make sure the tool slot is fitted on the oil pump shaft. DO NOT start the engine, if your oil pressure gauge is electric then just turn the key to the "ON POSITION" , and have someone inside the car telling you that you have oil pressure. Attach the cordless drill machine to prime tool and run it at CCW position, at the same time fill the oil cooler hose with about 1-1/2-2 quarts of motor oil, or until you have oil pressure present. Once you have oil pressure, re-install the oil cooler hose back, set the cordless drill machine to CW until the other person inside the car tells you that you oil pressure on the gauge. Remove prime tool rotate crank shaft to new marking of 25* after TDC install the Cam Sensor as per Casper's Instruction.
http://www.casperselectronics.com/store2/product_info.php?cPath=22&products_id=653
And it you don't have a Casper Cam Sensor Tool then you use this read up.
http://www.vortexbuicks-etc.com/cam_sensor.htm
When I replaced the timing chain I removed the balancer bolt with a 3/4" De Walt cordless Impact Driver, and a 1 1/8" socket from Advance Auto.
You might want to replace the Oil Pickup Tube being that they're cheap replacement.
You can use the impact driver to snug the balancer bolt back on, but I would use a torque wrench to tighten the bolt to 220 ft lbs.
Clamp vise grips onto the flexplate and it will wedge up against the block and stop the crankshaft from rotating, as you are tightening the bolt.
Also use red loc-tite on the cam bolts and on the Oil Pick Up Tube bolts, and I used it on the balancer bolt as well.
Same may said don't need to, but I did as my security satisfaction.
There are six bolts that goes through the water jacket engine block, and I also used Pertmatex Thread Sealant with PTFE (Item #80632).
The rest of the bolts you can use blue loc-tite on them.
Attachments

Buckshot G/N
Well-Known Member
- Joined
- Nov 2, 2011
Thanks again for the information ,this thread is bookmark . .
m3x1c0
Bad luck Buick
- Joined
- Jun 16, 2014
I can complete this in about 3 hours on a lift. Make sure that all sealing surfaces are SURGICALLY clean. Also be sure to let the silicon set up for 24 hours. I usually stop everything and wait overnight before I even put the pan back on. Loosening main bolts will help you get that old seal out. PM me if you have any questions.
I can complete this in about 3 hours on a lift. Make sure that all sealing surfaces are SURGICALLY clean. Also be sure to let the silicon set up for 24 hours. I usually stop everything and wait overnight before I even put the pan back on. Loosening main bolts will help you get that old seal out. PM me if you have any questions.
Cool! Thanks!!!!
Getting the pan off isn't an issue on my car since I run both HRParts motor mounts.
Sent from my iPhone using Tapatalk
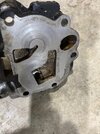
I'm trying this now this evening, and I'm stuck on getting the old rope seal out from under the crank. I've tried using a wire to help push on one side (and it goes down about 3/4" before I can't get it anymore (holding it in a vise grip tightly and tapping the vice grip with a hammer). The opposite side is just goop at the top--nothing to grab ahold with vice grips. I have tried getting and awl in it to work it up but it just makes it more fragile. Suggestions? I do have this on an engine stand so I have easy access.
Attachments
LANDAU LIMITED
Well-Known Member
- Joined
- Dec 20, 2015
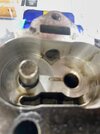
I screwed a sheetmetal screw in and pulled while turning the crank.
Turbobuick.com forum and Landau Limited for the Win!
Thanks. Screw got some out but still pulled apart, but I just tried it one more time and as it pulled out I screwed the thread even more and had enough to pull it all out. Thanks for the tip!
Thanks. Screw got some out but still pulled apart, but I just tried it one more time and as it pulled out I screwed the thread even more and had enough to pull it all out. Thanks for the tip!
Attachments
LANDAU LIMITED
Well-Known Member
- Joined
- Dec 20, 2015
I'd love to take credit but I got that from a post from Bison when I first did mine.
Similar threads
- Replies
- 8
- Views
- 423
- Replies
- 9
- Views
- 747