I posted this way back in 2003 on my personal web site. That web site is long gone from the internet, but I had a copy of it on my laptop. The advantage of this method is that absolutely no modifications are needed to your car. These fans have been on my car since 2003, and they still work great with no problems.
RAMCHARGERS DUAL FAN INSTALLATION
When I received my Ramchargers dual fans for my Grand National, my goal was to install them with no modifications to my car (no new drilled holes, etc.). Using the methods and bracket designs below, I was successful. It took me considerable time and patience to get everything right, but the results are worth it.
View attachment 166018
Here is the Ramchargers Dual Fan set-up. You can see that I've removed three of the four mounting tabs (all except the driver-side upper) prior to installing. I used a Dremel tool with a cutting bit followed by a sanding drum to cut-off the ears and smooth out the cut surfaces. You can leave the driver-side upper ear in place, as it does not interfere with anything.
View attachment 166019
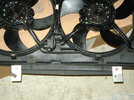
This photo shows the grinding that had to be done to the driver-side lower fan motor support to clear the steering gear box. I used a Dremel tool with a sanding drum to do this. Even with this much material removed, the support still comes very close to the steering gear box. You can also see one of the two holes I had to drill into the fan shroud for mounting. I used a 3/8" wood "paddle" bit to drill the holes in the shroud, which worked very well.
View attachment 166020
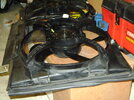
Here is a photo of the fans after the installation was complete. I have a Nick Micale radiator in my car, and I found that the fan shroud was about 1/8" too long to fit between the radiator tanks. I did not want to grind that much material off the fan shroud, so I used an alternate method. I placed weatherstripping (specifically, hood seal weatherstripping that I got from a junk yard) along the top and bottom edges of the fan shroud. I then sized my brackets to hold the shroud tight against the lips of the end tanks. I also placed a small piece of grey foam weatherstripping (purchased at a hardware store) between the shroud and the end tank lips to prevent rattling. Using this approach, the fans clear my CAS V2 intercooler pipes and the steering gear box, although not by much.
View attachment 166021
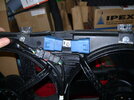
Here is a photo of the two top brackets that I made. This photo was taken prior to re-installing the two A/C line brackets that fit over these studs. I purchased two 1/8" thick "L" brackets from a hardware store (used to mount shelves) and cut to length with my trusty hack saw. I then used a large vice and lots of muscle power to add the second bend to give the brackets their "S" shape. A little clean-up on the bench grinder and some satin black spray paint give the brackets a very stock look. Note that it took a lot of trial-and-error to get the exact shape of the brackets correct. Also note that I had to remove the little clip that holds the wiring harness near the driver side bracket, as it was right in the spot where the bracket goes. You can also see the weatherstripping along the top edge of the fan shroud which seals the fans tightly to the radiator core. I chose to use a large round washer under the studs when I mounted the brackets for extra rigidity. These brackets are very rigid, and hold the fan very tightly to the radiator.
View attachment 166022
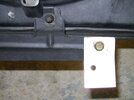
This is the passenger-side lower fan bracket that I made. I started with a 1/8" thick piece of steel, cut to length with a hack saw, and then used a vice and some muscle power to give it the slight "S" shape that you can see in the photo. A little clean-up on the bench grinder and some satin black paint gave it the final touches. I chose to use the existing hole in the lower radiator support to attach the bracket, so I did not have to drill a new hole. When I bent this bracket, I had the upper brackets complete and installed, along with the weatherstripping, so I could get the length and shape of both lower brackets exactly right. I then drilled the holes in the lower brackets, fitted them up, and marked the holes to be drilled in the fan shroud while the upper brackets were fully installed. In other words, I had all of the brackets completely done (including drilled holes) and installed before I marked the holes on the fan shroud. By doing this, I was sure that the holes in the fan shroud would be in the right place. You can also see the weatherstripping that I used to seal the bottom of the fan shroud to the radiator core in this photo.
View attachment 166023
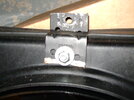
This is the driver-side lower bracket. As with the passenger-side, I used 1/8" thick steel. This was the most difficult bracket to make, because I had to put a "compound angle" into it to reach from the existing hole in the lower radiator support to a good location on the fan shroud. I started by cutting the steel to length (note the angle cut on the top of the bracket to clear the shroud protrusion around the blades), shaped on my bench grinder, and used trial-and-error to get the bends right. I then drilled the holes in the bracket. After fitting-up all of the other brackets, I marked the hole on the fan shroud. When I was done, all of the brackets and holes lined-up perfectly, and the fan is held very tightly to the radiator.

")